In the previous article of our Weekly White Belt Advice Series we have covered closed guard sweeps, so it makes sense to take a good look into closed guard arm attacks in this one. Sweeps and submissions tie well together in their attack-oriented nature, as you’ll see in some technique examples below – so, if you haven’t already read the piece on sweeps, be sure to do so, as being good at sweeping your opponents will also heighten your submission rates tremendously.
The Most Important Thing To Do When You Have a Closed Guard
Before we get to the actual techniques, let’s remind ourselves of the most important thing you need to do when you have someone in your closed guard: attack at all times.
Many jiujiteiros make a mistake of holding a closed guard for a longer period of time without doing anything. And, while simply holding your opponent in it and waiting for the right moment is sometimes a good thing to do, it is never a good approach to use the closed guard as a position of rest for yourself.
Remember: Brazilian Jiu Jitsu is a martial art, and in its essence lies the possibility of dominating and submitting your opponents through applying beautiful techniques, with a wide variety of colors to them. So you need to move towards that essence whenever you can – strive to be an offensive practitioner, not a defensive one. Never let your opponent rest. Make them uncomfortable and have them to always be on a lookout for what is coming next.
Closed Guard Submissions: So Many Options?
We’ll be taking a look into three general categories of submissions: arm locks, the triangle, chokes and back takes (which aren’t submissions, but it is very important to get to know them as well); done in unison with a presentation and analysis of technique videos, which show multiple submission variations for each category.
The most amount of attention to detail will be given to two submission types, which give you the most options for attacks and adjustments from closed guard: armbars and triangles.
Also, please take note that this is not meant to be a definitive guide to „all“ submissions. There are many options for finishing your opponent out there, some of which you’ll learn in class or on the Internet as time flies by. But, in order to learn how to apply these options and their variations, you first need to understand the underlying tenets of basic submissions and practice them.
So, we’d like to ask for one simple thing from you: focus on learning, understanding and practicing the guidelines and submissions from this article first, before you start looking for more „flashy“ and complicated setups. It will pay off as time goes by.
Now, let’s start with a submission type that has perhaps the largest number of variations: the arm locks.
Arm Locks
There are many possible variations of arm locks out there, but for the sake of simplicity we can divide them into three subcategories, depending on the joint which you are attacking: armbars (you are attacking your opponent’s elbow), shoulder locks (we’ll be looking at the most versatile shoulder lock – the kimura) and wrist locks.
Let’s take a look into a few different variations of the first two types of arm locks. We will not be looking at wrist locks for one simple reason: they are typically not allowed in BJJ competitions until blue or purple belt.
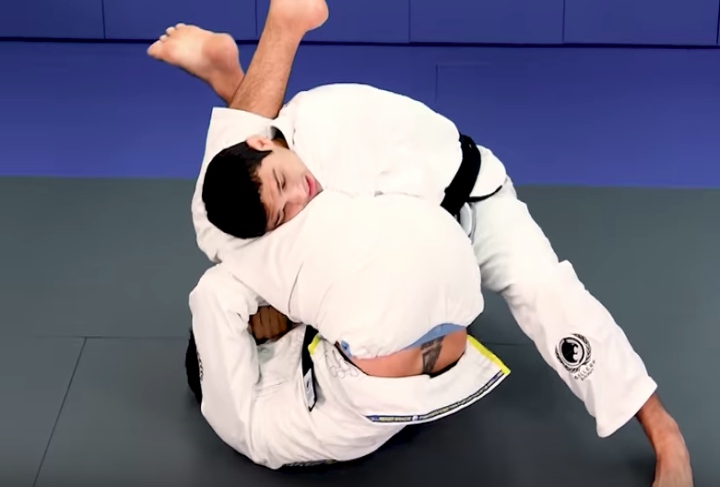
THE ARMBAR
Simply said, an armbar is a submission which forces your opponent to tap because you have immobilized their arm and are hyperextending their elbow joint.
Let’s see some of the most important, almost universal guidelines that will lead you across a vast majority of armbar variations.
General Armbar Guidelines
–>In order to start setting up the armbar, you will first need to break your opponent’s posture down.
–>Then, you will need to secure your opponent’s arm, which is usually done by gripping their wrist and behind their elbow. This prevents them from pulling it out easily.
–>In standard armbar variations from closed guard, you’ll need to move your opponent’s arm across the center line of your torso.
–>After that, you will need to engage your hips by lifting them up and shifting them into, preferably, a 90 degree angle to your opponent’s hips. This is an angle that will make the armbar work for you.
–>Your opponent’s elbow will need to be above the line of your hips. If this is not the case, then you don’t have an actual lock in place.
–>One of your legs will most often be used for controlling the opponent’s head by clamping it and pulling it down, so as to create distance between it and their hand – which decreases the chances of you getting stacked and which increases the pressure on their elbow joint.
–>It is necessary that you pinch your knees together when in the final stage of an armbar, so as to keep their arm immobilized and sturdy, thus minimizing your opponent’s chances of pulling it out.
–>You need to pull down on their arm (their forearm, essentially) and get it as close to your torso as possible. This will hyperextend the elbow.
–>While you are pulling down on their arm, make sure that your hips are engaged as well – pushing up towards the ceiling and against the bottom part of their arm in order to increase the pressure on the elbow joint.
–>Also, make sure that their thumb is facing upwards when you are finishing the submission.
Now that you know the general armbar guidelines, let’s take a look into its three variations.
Closed Guard Basic Armbar (No Gi)
John Danaher is one of the world’s greatest coaches, famed in wider Jiu Jitsu circles for his instructionals, in which he goes into very deep analysis of Jiu Jitsu techniques.
In this video, he goes on to explain the most important points for doing an armbar in No Gi. You should pay special attention to the importance that coach Danaher puts on having your opponent’s elbow inside your hips.
Points:
–>Notice the importance that coach Danaher immediately puts on the relation between your opponent’s head, his elbow and your hip.
–>Listen to the importance that he puts on having his training partner’s posture broken down and on keeping it broken – he does so by bringing his partner’s head down and keeping it there.
–>Notice that you need to move the opponent’s elbow at least to the inside of your hip. If it stays outside of it, then you will not be able to turn around and pivot on your hip, which is important for getting the angle that you need for performing an armbar with success.
–>Also, you should move the opponent’s elbow at least to the center line of your torso – ideally, it will be past it. This will ensure that their elbow will remain above your hips.
–>Danaher moves his training partner’s elbow past his center line by gripping with one arm behind the partner’s elbow (on the bottom of his tricep muscle) and by gripping the wrist with his other hand – and then pulling it.
–>Observe how Danaher moves to the side and „traps“ the arm he pulled across his center line by trapping it with his inner leg and hamstring muscles.
–>Also, take notes on how his legs have moved towards the partner’s shoulder blades, thus getting him into a high closed guard.
–>Notice that coach Danaher’s hand stays secured on his partner’s trapped elbow throughout the full movement.
–>Watch how he scoots his hips out further into a 90 degree angle, doing so by „swimming“ with his free arm under his training partner’s leg. Notice that his hips are elevated when doing so.
–>Observe that his leg’s hamstring muscle goes across the partner’s head and pushes against it in order to finish the armbar.
Closed Guard Basic Armbar (Gi)
This one shows how to perform an armbar when you and your opponent are in a Gi. Take special notice on the importance of using your „free arm“ to swim under their leg, which shifts your hips into an armbar-favorable-angle.
Points:
–>Take notes on the importance of having your opponent’s arm and sleeve controlled, but at the same time not controlling them „too much“ – in a fashion that will give your opponent a heads up that something is going to happen. To prevent this, you can almost nonchalantly reach with your arm across your opponent’s targeted arm, trapping it that way.
–>Notice the importance of having your opponent’s posture broken down at a 45 degree angle.
–>Observe that he utilizes his training partner’s pushing action – which he does in order to regain posture – against him, using it to swim his arm under his leg. He does this in order to pivot his hips to a favorable angle.
–>See that he does all of this while maintaining the training partner’s arm trapped with his own arm.
–>Notice the importance of lifting your hips up when performing an armbar.
–>Observe that your leg (the one above your opponent’s head) needs to be lower than the other one. This „clamping“ action will ensure that your opponent won’t defend the armbar by stacking you.
–>But, what happens if you get stacked anyway? Watch how he changes position with his arm, going under and through his training partner’s opposite leg, using it to spin under him. Then, he pushes that leg over the top, ending up in a top armbar position.
Reverse Armbar
In this video, you will learn how to do an armbar by attacking the elbow joint from a different angle. Also, you have an opportunity to see more details on breaking your opponent’s posture.
Points:
–>Notice the importance immediately placed on breaking the opponent’s posture and on mobilizing your hips.
–>Notice the importance of eliminating the space between your and your opponent’s hips as much as possible, as well as of climbing your guard a little bit higher and pinching your knees in. This will set you up for a favorable position to break their posture.
–>Observe how he pulls his training partner’s elbow to the side in order to flare his arm out, incapacitating him from preserving posture.
–>Watch how he reaches with his own arm under the opponent’s flared out arm, and how he keeps his own chin close to his partner’s triceps in order to isolate the shoulder.
–>Observe how he „looks at his watch“ before clamping his hands together, while simultaneously putting his elbow against his partner. This allows him to have an effective frame and to secure position.
–>Notice that he hip escapes and puts his foot on his partner’s hip.
–>Observe that, after he does the previous step, he transfers his left hand to his partner’s elbow and rotates the elbow towards himself, after which he secures his grip over the elbow once again.
–>At the same time, he’s bringing the partner’s wrist above his shoulder.
–>Watch how he pushes against his hip, in order to hip escape further and how he then applies pressure to the elbow in order to submit.
–>Notice the importance of creating space between you and your opponent in order to finish the armbar.
THE KIMURA
There are many types of shoulder locks out there, but the one which will be most versatile to your game and success (not just in submissions, but in controlling your opponent as well – we’ll take a look at this in one of the upcoming series of articles) is the kimura. This is the reason why it will be the only type of a shoulder lock we’ll take a look at, for now.
General Kimura Guidelines
–>Is your opponent’s elbow open (not close to their body)? If so – then you have an opportunity to get a kimura (this is applicable in all situations, not only closed guard).
–>At the beginning of the movement, you must reach over their shoulders with your arm.
–>Shift your hips so that they’re not square with your opponent’s.
–>Rotate their arm by rotating your hips and torso, not just by using your hands.
–>In order to finish the submission, rotate their arm with your hand in the same way you’d add gas when rotating a motorcycle handle.
Let’s see how to do a basic kimura from closed guard, as well as how to use the hip bump sweep to set the kimura up.
Basic Closed Guard Kimura
The kimura is such a powerful submission. In this video, Chewy explains the basic setup behind it – applicable both in the Gi and No Gi.
Points:
–>Observe that your opponent needs to have his arm postured on the mat. To place it there, you can go under their arms and make a „circle“ in order to get rid of their placement on your body, while simultaneously pulling your opponent towards you with your knees. Or, you can go on the outside, grip their wrist, arch your back and pull them with your legs to get the same effect.
–>Notice where Chewy grips his training partner’s arm: on his wrist. After that, he locks his arm out.
–>See that, when opening his guard, Chewy hip escapes in order to make space and then shifts to the side onto his hip.
–>As you sit up, go around your opponent’s elbow in order to get the so called „figure four lock“. Also, pay attention to remove your thumb when locking the grip.
–>Be sure to bring your elbows in when you are getting the figure four lock, so as to make it easier for yourself to secure the grip and have a stronger position.
–>After securing the lock, scoot out with your hips and then turn towards your opponent.
–>Place your leg over their back, in order to prevent them from escaping.
–>To finish the kimura, rotate your opponent’s wrist just as you would rotate a motorcycle handle.
–>Keep your elbows in tight.
Hip Bump Sweep Kimura
But, what should you do if your opponent keeps his posture and is sitting back in your closed guard? Well of course – you can hip bump sweep them!
However, here’s a little secret for you: you can also set that hip bump in order to get a kimura! Let’s learn how to do that.
Points:
–>Observe how he opens his guard and puts his feet firmly onto the ground. At the same time, he is posturing with his back hand and reaching across the training partner’s shoulder with his other hand, securing the elbow with it.
–>Watch how he then backs his leg up slightly, while pushing with the other one. This makes for a driving movement with his hips, going into his training partner in order to initiate the sweep.
–>If your opponent posts his arm to prevent the sweep, then it is time to do the kimura.
–>It is absolutely critical that you immediately shift your hip towards your opponent’s wrist.
–>Observe the interesting way he grips his training partner’s wrist: it is done by curling up his own wrist against the partner’s wrist, while simultaneously „regularly“ gripping with his other arm in order to secure the figure four lock.
–>See that he posts his leg over his training partner’s lower back, in order to prevent him from escaping.
–>Observe that, in order to finish the submission, you must not push the opponent’s arm up. Instead, pull their elbow up towards your chest and then rotate their wrist in order to finish the kimura.
–>However, what should you do if your opponent leans back onto their arm and straightens it in order to prevent the kimura? Simple – you get the figure four lock and proceed with your hip bump, landing into mount.
–>To finish the kimura from there, you can either step with your far leg over their head and „fold“ as you’re rotating their arm; or you can go into a side control position and finish the kimura from there (something we’ll look at in the upcoming articles).
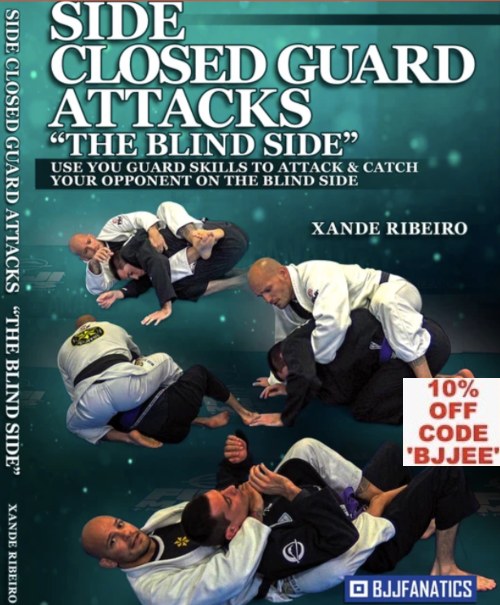
Use your guard skills to attack and catch your opponent on the blind side.
- World black belt absolute champion Xande Ribeiro shows you the closed guard system that made his guard one of the best
- The side closed guard is a closed guard variation that gives you a dominant angle to attack from off your back.