Guest post by Evolve MMA, Asia’s premier championship brand for martial arts. It has the most number of World Champions on the planet. Named as the #1 ranked martial arts organization in Asia by CNN, Yahoo! Sports, FOX Sports, Evolve MMA is the top rated BJJ gym in Singapore.
While the term “Arm Triangle Choke” is used quite frequently to describe one particular submission hold, there are actually several variations of Arm Triangles, each with their own strengths and weaknesses. Some are best utilized from mount and side control, while others are better used to counter your opponent’s attempts to escape from the bottom. As each Arm Triangle is utilized from a different scenario, it would be wise to practice all of them, so that you can attack with an Arm Triangle from every position!
1) The Kata Gatame
Often when a Brazilian Jiu-Jitsu (BJJ) practitioner uses the term “Arm Triangle,” they are referring to the Kata Gatame stranglehold, as it is by far the most common of all the Arm Triangle variations. Like many other techniques seen in modern BJJ, the invention of the Kata Gatame can be traced back to Judo, but it wasn’t until it was integrated into the complete grappling system seen in BJJ that the submission developed its full potential.
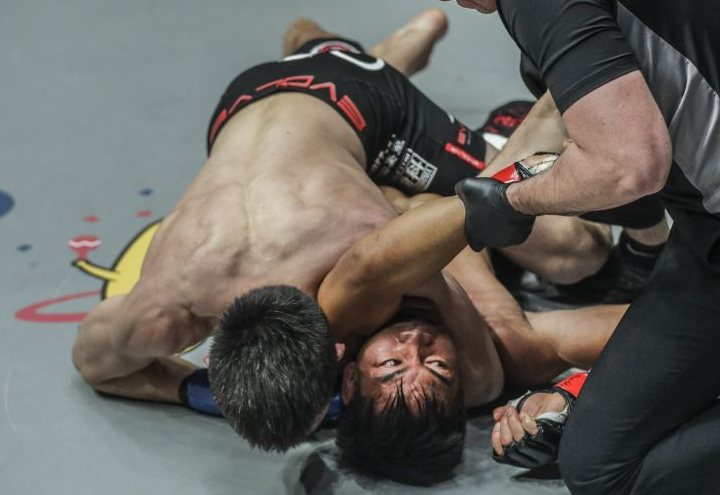
The Kata Gatame is often called a “Front Arm Triangle,” as it is implemented when you and your opponent are facing each other, in a chest-to-chest situation, such as the mount or side control. In order to strangle your opponent with the Kata Gatame, the first step is to get one of his arms extended, so that you can achieve the “one arm in, one arm out” scenario that is necessary for all variations of Triangle Chokes. A great way to do this is to drive your shoulder into your opponent’s face from side control or mount, creating shoulder pressure. When he inevitably tries to push you away, he will extend his arm, allowing you to trap his arm and head in your choke. From here, wrap your arm around the back of his neck, and lock a palm-to-palm grip. While it is not always necessary, many practitioners like to dismount, moving their entire body off of their opponent and into side control, on the side of the arm that is trapped in the strangle. Now squeeze slowly, and wait for your partner to tap!
2) The D’Arce Choke
Unlike the Kata Gatame, whose roots can be traced back to Japanese Judo, our next Arm Triangle variation, the D’Arce Choke, is an entirely modern invention. The D’Arce Choke (which is pronounced “darce”) was invented and popularized by Joe D’Arce, who holds a 3rd-degree black belt under the legendary Renzo Gracie. While the D’Arce was once considered a “flashy” technique that wouldn’t be effective against skilled opponents, this notion has long been proven false as the D’Arce Choke is utilized frequently at the highest levels of BJJ, MMA, and NoGi Grappling.
While the Kata Gatame is initiated when two grapplers are facing each other, the best time to use the D’Arce is when you and your opponent are perpendicular; ideally when he is on his side. The most common situation we see the D’Arce used is when the bottom fighter is attempting to use an underhook to sweep from half guard or side control. As soon as your opponent attempts to establish the underhook, overhook his arm, and shoot your wrist under his neck so that your thumb is touching the base of his skull. Then, use your free hand to stuff his head into your chest, as you lock up a figure four grip by grabbing your free arm’s bicep with your overhooking arm. Now that the choke is secure, you can focus on the finish.
The key to finishing the D’Arce choke is to sprawl your legs back so that all of your weight is put on your opponent’s neck. If they don’t tap out after you sprawl, simply “twist” to face his legs, which will greatly increase the pressure, and force him to submit.
3) The Anaconda Choke
The Anaconda Choke is perhaps the least-used of all of our Arm Triangle variations, but that doesn’t mean it is any less effective at strangling your opponent. While the choke became popular after Antonio Rodrigo Nogueira used it to submit Hirotaka Yokoi in PRIDE, credit for the development of the Anaconda Choke goes to the UFC and Strikeforce veteran Milton Vieira, who used the submission to great effect throughout his career.
The Anaconda Choke can be set up any time your opponent’s head is below yours, and you have the capability to grab it. While this can happen in all sorts of positions, the most prominent place the Anaconda is set up from is the front headlock. If your opponent shoots in an attempt to take you down, establish the front headlock by sprawling on him and grabbing his chin. Then, take the hand that is holding his chin and shoot it through to his armpit, so your arm is crossing underneath his body. The next step is to lock up the choke with a figure four. Just as we did with the D’Arce Choke, seal the lock by grabbing your free arm’s bicep with the hand that was extended through the armpit. Once the choke is locked, you can finish by executing a “gator roll,” rolling underneath your opponent on the side of the arm that is trapped. Roll all the way underneath him so that he is on his side, and then squeeze to finish the choke.
One advantage of becoming proficient with each of these Arm Triangle variations is that although they are different submissions utilized from different positions, the mechanics of strangling your opponent remain the same. In each variation, your arm cuts off one of the carotid arteries, while you use your bodyweight to force your opponent’s shoulder into their neck, sealing the other. As each of the Arm Triangle variations uses this mechanic, practicing one will facilitate you in getting better at the others! Make sure you use all three though, as they each have their own strengths and weaknesses!


