Let’s keep it real: there have been lots of times when you were stuck in your training partner’s or opponent’s Mount when you’ve resorted to doing the bridge and roll technique – otherwise known as the Upa – to escape… But failed doing so more often than not, coming to believe that: „Shucks, the Upa is just not practical! It’s too easy for them to prevent it!“
Well, as somebody once said – BJJ is perfect, it’s the practitioner that makes mistakes. And so is the case with the Upa; there are details which, if you get them right, will make this technique work wonders for you. SBG’s Matt Thornton explains those details greatly.
ELBOWS AND TAILBONE TUCKED
First things first and basic Mount defense advice need to be repeated and re-emphasized; Matt points out that when you’re in someone’s Mount, you need to keep your elbows tucked in. If you don’t, your training partner or opponent will be able to climb up to High Mount, isolating your arms and rendering your defense a bit more useless.
Then, as a second point for the start of a successful Upa escape, Matt points out that you should tuck in your tailbone. This is a detail that’s not heard about often; however, if you tuck in your tailbone before you do the bridge, you’ll engage your core and, therefore, be more successful in fighting off possible back injuries down the line.
At the same time, Matt says that this small adjustment will also make your training partner or opponent feel a little bit less comfortable then they were beforehand, as you know have created a stronger connection to them.
GRAB THEIR ARM, TURN YOUR HEAD AWAY AND TRAP THE FOOT
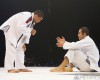
Now, the technique usually starts off with your training partner or opponent reaching for and grabbing your collar, initiating the Cross-Collar Choke.
Matt shows that you start your defense by grabbing onto their gripping arm – all the while keeping your elbows low and pointing at them, not at the ceiling, to keep them from climbing up – and by moving your head away from that arm.
Now, before he does anything else to further his escape setup, Matt needs to trap his training partner’s foot (which, he emphasizes, in a competitive situation he does first). But it’s not just about putting your own foot over their leg, however…
CRITICAL UPA DETAILS
… For, if you were to just place your foot over your training partner’s or your opponent’s one, it will be pretty easy for them to just pull their foot out and re-establish position; or to counter it by moving to Side Control, as demonstrated both by Matt and his training partner in the video.
So, Matt emphasizes that your goal is to make your opponent to defend from the hips down – if you manage to do that, you have the angle right!
And how is it that you’ll achieve the necessary angle? Matt shows that, yes, you first need to trap their foot with your own foot, but then you need to roll your knee in the direction where your Upa will go towards, at the same time doing a side crunch in the opposite direction, bringing your elbow to your hip by doing so. Now, when they go on to attempt to pull their leg out, it’ll be extraordinarily difficult for them to do so, because your hip is trapping their calf muscle.
This setup makes it possible for you to flip your training partners and opponents, despite their attempts to post.
Matt explains how to do the Upa correctly on the video below: