In the previous article of our Weekly White Belt Advice Series we have covered closed guard sweeps, so it makes sense to take a good look into the highest percentage closed guard chokes in this one. Sweeps and submissions tie well together in their attack-oriented nature, as you’ll see in some technique examples below – so, if you haven’t already read the piece on sweeps, be sure to do so, as being good at sweeping your opponents will also heighten your submission rates tremendously.
The Most Important Thing To Do When You Have a Closed Guard
Before we get to the actual techniques, let’s remind ourselves of the most important thing you need to do when you have someone in your closed guard: attack at all times.
Many jiujiteiros make a mistake of holding a closed guard for a longer period of time without doing anything. And, while simply holding your opponent in it and waiting for the right moment is sometimes a good thing to do, it is never a good approach to use the closed guard as a position of rest for yourself.
Remember: Brazilian Jiu Jitsu is a martial art, and in its essence lies the possibility of dominating and submitting your opponents through applying beautiful techniques, with a wide variety of colors to them. So you need to move towards that essence whenever you can – strive to be an offensive practitioner, not a defensive one. Never let your opponent rest. Make them uncomfortable and have them to always be on a lookout for what is coming next.
The Triangle Choke
When performing the triangle choke, you are forcing your opponent to tap because of restricted blood supply to their brain – which happens because you are applying pressure to their neck’s carotid arteries.
But, before getting to finish the submission, there are some general guidelines you need to follow.
General Triangle Guidelines
–>You need to have your opponent’s posture broken down (in most cases, at least; Ryan Hall shows what to do when they keep their posture upright).
–>One of their arms need to be within your legs, the other out. You need to have good grips on the arm which is within your legs all the way up to the very finish.
–>That „inside“ arm also needs to be pushed out to the side and across the center line of your torso, which will place your opponent’s shoulder into a favorable position.
–>The leg that goes over your opponent needs to, with your calf muscle and upper hamstring, cover their so called „shoulder line“ – the line both of their shoulders make between each other on their backside. This is a proper position for that leg.
–>You need to create an angle to finish the triangle; you cannot have your hips square with your opponent’s. It is mostly recommended to have a 90 degree angle to them.
–>In order to make sure that you have a good angle, a good tip is to try and see your opponent’s ear – this means that you’ve angled yourself out properly to finish the triangle.
–>If the situation permits, try not to lock in the final triangle choke with your other leg, until you have shifted your hips into the right position. To do this, you need to keep your first leg in position by using your hand to grab yourself by the ankle of that leg; then, use your other leg’s foot to push off their hip in order to create the angle.
–>Elevate your hips when finishing the triangle.
–>Squeeze with your legs (and hamstrings) to finish the triangle.
Let’s now learn some concrete triangle choke techniques.
Basic Closed Guard Triangle Choke (No Gi)
Let’s take our first look into the triangle choke, performed in a No Gi situation.
Points:
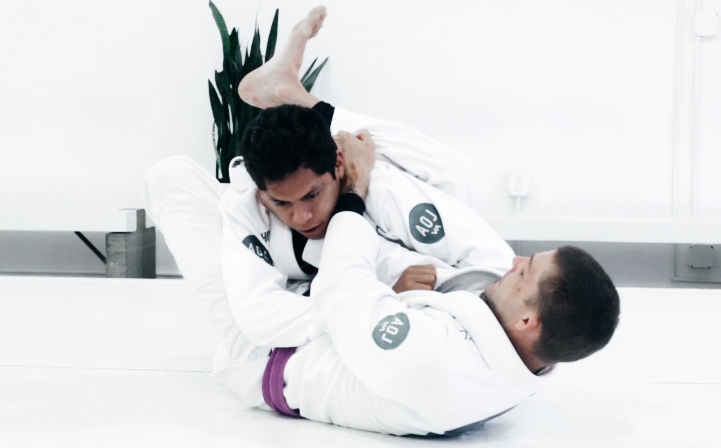
–>Watch as Chewy goes under his training partner’s arms and pulls him with his legs, in order to break his posture.
–>Look at how he goes for the so called „overhook“ in order to keep his training partner in place – he does so by going behind his armpit and by pinching his tricep. This secures the overhook.
–>Look at how his training partner goes on to try and regain his posture; he does so by posting his arm onto Chewy’s hip. As soon as he does that, an opportunity for a triangle is opened up.
–>Chewy pushes that arm into his partner, holding it and locking it into place.
–>Watch how Chewy pulls the partner towards him in order to make him react by trying to posture back up; as soon as he does this, Chewy shoots up with his hips in order to lock the legs and squeezes the opponent with his knees in order to get into an initial triangle position. This position is not a finishing one, but it is a big step in the process.
–>Notice that the leg that comes up below his training partner’s arm is the one that stays on top when the initial triangle position is locked.
–>Watch how Chewy lifts his hips up yet again, in order to move his training partner’s arm across the center line of his torso.
–>Watch as he then proceeds to grip both the partner’s head and his own shin in order to position his leg into the right position.
–>Observe how his leg covers his partner’s shoulder line – you cannot see his shoulders from above anymore. This is a proper position, covering the shoulder line which goes from one shoulder to another.
–>Then, he pushes with his other leg off the mat in order to make an angle and to lock the final triangle choke position. As an alternative to this, he advises to use a „ratcheting motion“ in order to lock the triangle up.
–>When you lock the triangle, Chewy advises that you pinch your knee into their neck and then clamp down with your leg. Keep your feet pointing up towards the ceiling, and then – as you clamp down with your leg – pull their head down, finishing the triangle choke.
Scissor Sweep Setup for a Triangle Choke
Haven’t we already said that you can use sweeps in order to immediately set up submissions? One of the sweeps that you can use for this purpose is the scissor sweep, which you can use to threaten your opponent and lock him into a triangle instead.
Let’s see what happens if your opponent knows that you want to scissor sweep him and maintains his base.
Points:
–>Observe that the grips remain the same throughout the whole initial movement.
–>Notice that Chewy puts his „outside“ leg’s foot on his partner’s hip; all the while he places the shin area of his other leg and pushes it into his partner’s arm, pinning it to his chest.
–>You need to push with this second leg and „pop“ it up explosively. While you’re doing that, you need to be pushing with your first leg into his hip – and to keep on pulling with your grips – to get yourself into a favorable angle and to get the „popped“ leg over the line of his shoulders.
–>Lock the triangle, pinch your knee towards their neck and keep your feet pointing up, pulling their head down in order to finish the triangle.
Hip Bump Sweep Setup for a Triangle Choke
One of the Jiu Jitsu all-time greats, Ryan Hall, is famed for – among other things – his knowledge of the triangle choke.
In this video, he walks us through an even more detailed look into the hip bump sweep and how this sweep can translate well into a triangle.
Points:
–>Ryan Hall speaks about your opponent’s necessity to post his arm if he wants to prevent your hip bump sweep. There’s no other way around it: either he’ll fall and you will sweep him into a mounted position, or he will post his arm – and then you have an opportunity for a triangle choke from there.
–>Hall says that you need to understand the basis of the hip bump sweep first: you’re not trying to get your opponent to „tip“ sideways/laterally, as he is too strong for that. Instead, you’re trying to sweep him into what Hall calls a „back corner“. This is why the „bump“ in the hip bump sweep is so important, as you are driving your hips into him and thus effectively bumping him backwards.
–>Notice the importance of clearing the opponent’s arm out of the way.
–>As he opens his guard, Ryan puts his knee directly in front of his training partner’s knee, in order to block that leg from posting. He also covers the partner’s shin with his calf muscle, so as to further strengthen this position.
–>Notice the importance of posting your „driving“ leg properly when doing the hip bump: it needs to go behind you, rather than further away from you.
–>As your opponent posts his arm to prevent the sweep, you need to hold onto the back of his head, which will prevent you from falling backwards.
–>Then, Hall says that you need to „throw“ your leg across your opponent’s shoulder line. The idea is to suspend yourself in mid-air, as you now have the leg across his shoulders and as you are holding onto the back of his head with your hand.
–>As you are suspended in mid-air, it is easy to lock the triangle with your other leg.
Chokes
Chokes from closed guard (performed in the Gi) work well because you have control over much of your opponent’s general movement; you are keeping him at a fixed distance and manipulating his posture, all the while applying the choking pressure to his carotid arteries with your hands.
General Choke Guidelines
–>You’ll have to break their guard and keep it broken down to perform these chokes.
–>Make sure that your knuckles or forearms, as well as the lapel (depending on the specifics of the actual choke) are pressing against their carotid arteries – that you’re not just „crushing“ their throat, which will rarely lead to submitting them.
–>If you need to use strength a lot, then you’re not doing it right. Again, remember to position your arms properly, against their arteries; it should not take a lot of strength to tap your opponent if positioning is correct.
–>As a general rule, when in doubt – reach deeper into your opponent’s collar.
–>Pinch your elbows to your chest and don’t let them flare out when you are finishing a choke. This will make it tighter.
–>Be wary that you can take advantage of your opponent’s attempts to get his neck free from the choke; he will use his arms to do so. When he does that, you’ll have options to transition to an armbar.
Let’s take a look at two basic techniques: the cross collar and the lapel choke.
Closed Guard Cross Collar Choke
The cross collar choke is a relatively simple one, but it takes a lot of practice to learn how to perform it well. Follow these important points in order to make it work for you.
Points:
–>Observe how he opens the collar up with one hand, in order to reach deep into it with another one.
–>Notice that his wrist is straight, not bent, and that it is pressing against his training partner’s neck. Also, notice how his fingers are inside the collar.
–>Observe how he breaks his posture even more.
–>With the other hand, he grabs above the already gripping arm and „feeds“ the thumb into the collar. Then, with that arm, he goes around the training partner’s head and presses the forearm against his neck.
–>Then, he pinches both of his elbows down towards his chest in order to finish the choke.
Closed Guard Loop Choke
The loop choke is another great closed guard submission. When performing it, pay extra attention that you’re flexing and pressing your wrist deep into your opponent’s neck. Remember: you’re not achieving anything by just pushing into their neck; but by cutting off blood supply to their brain, you will force them to tap.
Points:
–>Notice that here, as in comparison to the cross collar choke, instructor Thomas Lisboa’s collar grip is not too deep or rigid. It is lower on the collar and a little bit loose.
–>In order to sit up, instructor Lisboa says that you need to open up your guard. Then, plant your feet firmly into the mat and sit up immediately, cupping the back of your opponent’s head with your free arm.
–>As you are sitting up, you need to open up your elbow on the hand that holds the collar grip – so that you can make space for your „clamping“ hand to shoot through it.
–>Immediately after your hand goes through that space, do a little hip escape to the side and cross your legs around your opponent, so as to prevent him from escaping.
–>To finish the choke, stiffen up the wrist of your „collar“ arm and straighten the „through“ arm a little bit, in order to put real pressure onto the artery and to finish the choke.
Use your guard skills to attack and catch your opponent on the blind side.
- World black belt absolute champion Xande Ribeiro shows you the closed guard system that made his guard one of the best
- The side closed guard is a closed guard variation that gives you a dominant angle to attack from off your back.


