
Guest post by Evolve MMA, Asia’s premier championship brand for martial arts. It has the most number of World Champions on the planet. Named as the #1 ranked martial arts organization in Asia by CNN, Yahoo! Sports, FOX Sports, Evolve MMA is the top rated BJJ gym in Singapore.
Heading: Add Extra Depth To Your Fitness Routine
An effective workout burns calories and puts your cardiovascular system through its paces. It can also be therapeutic, preventing sports and occupational injuries that can cause long-term trouble. This is an excellent reason to use core stability exercises to sculpt the torso and perform preventative physiotherapy from professional occupational health services.
Proper strength and conditioning consists of not only resistance and weight lifting exercises, but also includes stabilization exercises. Core stabilization exercises generally target three major muscle groups. The first is the transverse abdominis and internal oblique muscles, which form a corset around your trunk. The rest of the back and stomach muscles rest on top of this layer of muscle. You engage these muscles whenever you suck in your gut.
Next comes the multifidus, a muscle that spans the length of your spine, from neck to pelvis. It has a column of short fibers that extend from the main band of muscle. Each muscle fiber connects two adjacent vertebrae in the spinal column.
The third muscle group is the pelvic floor muscles. These are the ones you engage when you really need to urinate but have to hold it in for some reason.
Exercising these groups of deep muscles builds their power and tone, which allows them to reinforce your torso. Tighter, more powerful muscles also add power and efficiency to your movements. In addition to giving you the feline grace of a panther, toned muscles reduce the risk of injury.
How Core Stabilization Exercises Work
Core stabilization exercises teach you to engage the deep muscles described in the previous section before you start to move. With practice, your body will start to engage the different sets of muscles in the correct order. This translates into powerful, effective movement as you perform a variety of physical activities.
Making a lifestyle out of core stabilization exercises prevents lower back pain and different kinds of occupational and sports injuries.
Simple Core Stability Exercises To Add To Your Workouts
All core stability exercises require you to avoid the use of momentum as you work your core. You’ll need to observe good form if you want the exercises to target the right muscles. We cover the steps you need to take to keep good form for each exercise.
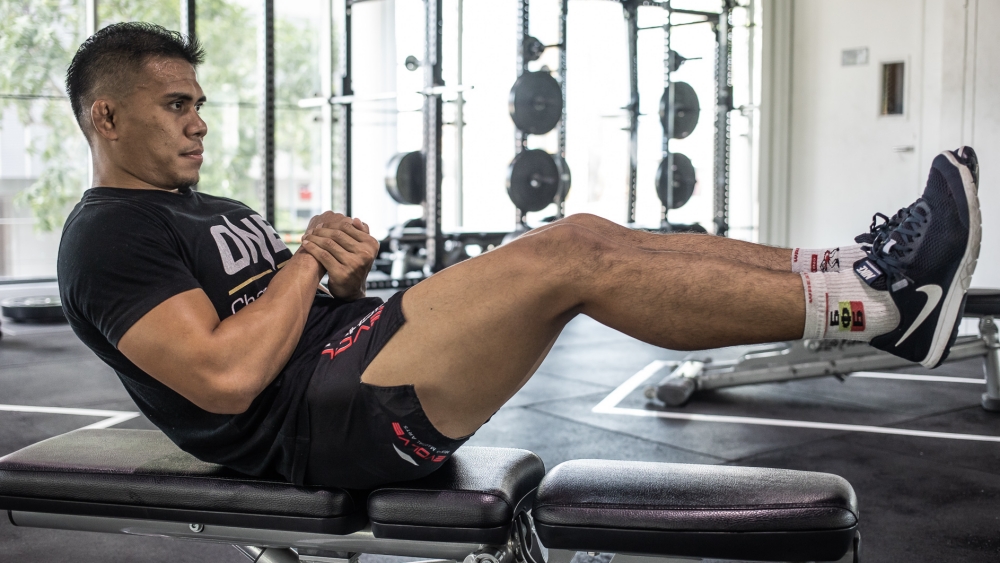
1) Crunches
This taxing but straightforward exercise works almost every muscle in your abdomen and sides. You start by laying on your back with your arms crossed (hands on the opposite shoulder) and your knees bent. Then you perform the following:
- Engage your core muscles by sucking your stomach in, like you’re pulling your navel towards your spine.
- Raise your chest and shoulders off the ground, making sure that your lower back remains in contact with the floor the whole time.
- Lower yourself back to the floor and relax your abdominal muscles.
Perform as many reps as you can, depending on the duration of your workout and your ability to maintain good form.
A second version of the crunch puts the oblique abdominal muscles to work. To perform this variation, you raise your chest off the ground while directing your right shoulder to your left knee. The next rep should have you aiming your left shoulder at your right knee.
2) The Forearm Plank
This resistance exercise forces the muscles in your torso to remain engaged as they strive to keep your body off the ground. You start by lying facedown on the floor with your palms down and next to your head.
- Engage your core muscles.
- Raise your body off the ground such that only your toes and forearms remain in contact with the ground.
- Your elbows should sit directly under your shoulders, and your spine should be straight, with no sagging or arching.
- Hold this position for 10, 15, or 20 seconds, depending on your fitness level.
- Lower yourself back to the floor, relaxing your core muscles on the way down.
You can repeat this exercise two or three times, holding the plank position as long as you can for each rep. To make the exercise more challenging, perform lateral toe taps in the plank position. This requires you to move each leg to the side and tap the floor, alternating between the right and left legs.
3) Side Plank With Rotation
If you want to give your oblique muscles a good workout, try rotating your trunk while in the plank position. Use one forearm to keep your body in a side plank, with the lower arm pointing ahead and away from you.
- Lie on your side and cross your legs so that the side of each foot touches the ground.
- Engage your core and raise your body to the side plank position, with your legs extended.
- Raise your free arm straight up and over your chest.
- Lower the arm back down and tuck it under your ribs.
Perform as many reps as you can with your core engaged and your spine straight. Switch sides and resume the plank position with the previously free arm as the anchor. Alternate sides and repeat the exercise.
4) The One-Legged Deadlift
This Yoga-esque exercise works the muscles of the lower back, the abdomen, and the glutes. You can do it with your body weight alone, but for today we use a pair of dumbbells:
- Start by standing straight, with your arms by your sides and a dumbbell in each hand.
- Now, engage your core and hinge your pelvis so that you bend forward. As your upper body bends towards the ground, lift your foot off the ground and extend it backward.
- Keep your spine neutral and maintain your balance. Your arms should remain neutral as they hold on to the dumbbells.
- Bend forward until your upper body and the leg on the ground form a 90-degree angle. Hold that position for a few seconds before raising your torso back to an upright position.
- Lower your leg as you come back up and keep your arms neutral. Your core should do the heavy lifting, so keep your core engaged as you come up,
5) Deadbugs With A Stability Ball
We add a stability ball to this exercise to ensure good form and work the target muscles harder. The hip bridge is an exercise that strengthens the lower back and pelvic muscles, which guards against lower back pain.
- Drop to the floor, lie on your back and hold an exercise ball to your chest.
- Raise your legs at a 90-degree angle to your upper body and hold the ball against your knees with both hands.
- Contract the muscles in your core.
- Extend your right arm and left leg while keeping the ball in place with the other limbs. The arm and leg should extend to touch the floor.
- Bring your right arm and left leg back to their original positions at the exercise ball, releasing your core muscles in the process.
- Engage your core again.
- Extend the left arm and right leg while keeping the ball in position with the other limbs.
- Bring the left arm and right leg back to their original positions, releasing your core muscles in the process.
The deep muscles around your spine, abdomen, and back will get a complete workout that increases their strength. This translates to better posture with every movement you make. The muscles keep the spine and pelvic bones in alignment, which guards against back injuries.
Add Extra Depth To Your Fitness Routine
An effective workout burns calories and puts your cardiovascular system through its paces. It can also be therapeutic, preventing sports and occupational injuries that can cause long-term trouble. This is an excellent reason to use core stability exercises to sculpt the torso and perform preventative physiotherapy.
Include them in your workout to add variety and extra health benefits to your fitness routine.